Squish to Condish Method for Every Curl Type
Use the squish to condish method to lock in water: steps, rinse rules, and tweaks for waves, curls, coils, and porosity.
Your hair is clean and dripping, but your fingers still catch at the ends. You add more conditioner, chase that silky feeling, and wonder whether you're helping your curls or setting yourself up for flat roots again.
The squish to condish method works best when you treat it as an adjustable way to distribute water and conditioner, not a challenge to leave as much product behind as possible. The useful result is hair that groups together easily while wet and dries soft without feeling coated. Getting there means choosing the right section size, knowing when to stop scrunching, and being deliberate about the rinse.
What Squish to Condish Does on Wash Day
Squish to condish combines conditioner, soaking-wet hair, and gentle upward scrunching. You cup water into the lengths, lift them toward the scalp, and release. That movement helps spread the conditioner-water mixture and encourages neighboring strands to gather into clumps.
The technique is generally credited to curly-hair educator Melissa Stites, whose approach emphasized water retention rather than conditioner application alone, according to HairAide's account of squish to condish. Its distinctive squishing sound comes from compressing very wet, conditioned hair, not from squeezing harder.
Think of conditioner as the lubricant that lets you arrange wet strands without dragging them apart. This isn't a reason to force product into your hair or keep adding it until the lengths feel heavy. A comfortable glide is useful; a thick coating isn't the target.
Choose a starting setting
The table below gives practical starting points, not fixed prescriptions. Density and strand thickness can override curl category, so a fine, loosely packed curl pattern shouldn't automatically receive the richest setting.
Squish to condish settings by hair profile
| Hair profile | Conditioner | Water and scrunches | Rinse | Watch for |
|---|---|---|---|---|
| Fine waves 2A–2C | Thin layer on lengths only | Brief, gentle scrunching; add water only when slip fades | Full rinse | Limp roots, slow drying |
| Medium curls 3A–3C | Generous enough to coat mid-lengths and ends | Small handfuls of water; stop when clumps hold together | Start with a full rinse; assess whether ends need more conditioning | Clumps that separate |
| Dense coils 4A–4C | Enough for easy detangling in smaller sections | Add water throughout each section rather than working only the surface | Rinse according to the product directions; assess ends separately | Dry ends, broken clumps |
| Low porosity | Lighter formula, comfortably warm water | Add water until the mixture spreads; don't pile product on | Fuller rinse | Product sitting on the hair |
| High porosity | Richer conditioner concentrated on ends | Repeat water cups to keep exposed lengths soaked | Rinse, then use a suitable leave-in on ends if needed | Frizz as it dries |
| Low density or buildup-prone | Minimal amount on lengths, off the scalp | Fewer handling passes, gentle pressure | Thorough rinse | Greasy roots, flat shape |
Rinsing fully doesn't cancel the technique. You've still used water and gentle handling to distribute conditioner and arrange the lengths. Although partial rinsing is associated with the original approach, the amount left behind shouldn't become a test of whether you performed it correctly.
For a broader view of shaping wet clumps, our guide to how to define curls helps separate conditioning from the hold you'll need afterward.
Before turning on the shower, choose your starting profile and intended rinse level. That small decision prevents the familiar cycle of adding product because you haven't decided what enough feels like.
Find Your Row Before Wash Day
A curl letter describes shape. It doesn't tell you how easily your hair wets, how much scalp shows through, or how heavy your conditioner can be before the shape collapses.
Start with clean hair and your usual wash-day behavior. Product-coated hair can seem resistant to water even when the coating, rather than the strand itself, is the problem.
Read porosity from behavior, not a floating strand
A shed-hair float test looks convenient, but it isn't a dependable way to choose your conditioning routine. Surface tension, residue, and the way you place the strand in water can affect whether it floats. Don't assign your entire head a permanent porosity label from that result.
Instead, observe a cluster of behaviors:
- Wetting: Does water spread through clean lengths readily, or do you need to separate sections to reach the inside?
- Product feel: Does conditioner distribute easily with water, or remain obvious on the surface?
- Condition variation: Do lightened ends feel rougher and tangle more than untreated growth?
- Response after rinsing: Do the lengths feel flexible, or do they feel coated despite a thorough rinse?
These observations help you select a starting approach without pretending you've measured porosity precisely. Bleached ends and untreated roots may need different amounts of conditioner on the same head.
Density is the amount of hair growing across your scalp. Strand thickness is the size of each individual hair. You can have lots of fine strands or relatively few coarse strands, and those combinations behave differently.
Look at your natural part and the coverage around your crown under consistent lighting. Don't use ponytail thickness as a diagnosis, especially if your hair is short, layered, or tapered.
Choose the setting for the part of your hair that needs managing, not the curl photograph that looks most like you.
Similar curls, different handling
Consider a man growing out a fade with tightly curled hair on top. The cropped sides don't offer enough length for a full palmful of scrunching, and rubbing conditioner across them may leave the haircut looking slick. He can smooth a small amount through the longer top, detangle gently, and rinse the sides clean.
Now consider someone with long curls, dense roots, and highlighted ends. Treating all that hair as a single bundle can leave the outside slippery while the underneath stays tangled. Smaller sections let water reach the interior, while extra conditioner belongs on the vulnerable ends rather than automatically at the roots.
Neither person needs a different technique because of gender. They need different handling because of length, density, scalp behavior, and chemical history.
Root oiliness deserves its own decision. If your roots lose lift while the ends still feel comfortable, keep conditioner away from the scalp instead of changing the entire routine to something richer.
Choose the dominant profile that best matches your current difficulty. When profiles overlap, I'd start with the lighter conditioner setting and improve sectioning before increasing product. You can add conditioning selectively; removing a heavy coating after styling is much less convenient.
Step by Step Squish to Condish and Finishing
Set out your rinse-out conditioner, a wide-tooth comb if you use one, your styler, and a cotton T-shirt or microfiber towel. Keep them within reach so your hair doesn't start drying while you search for the next product.
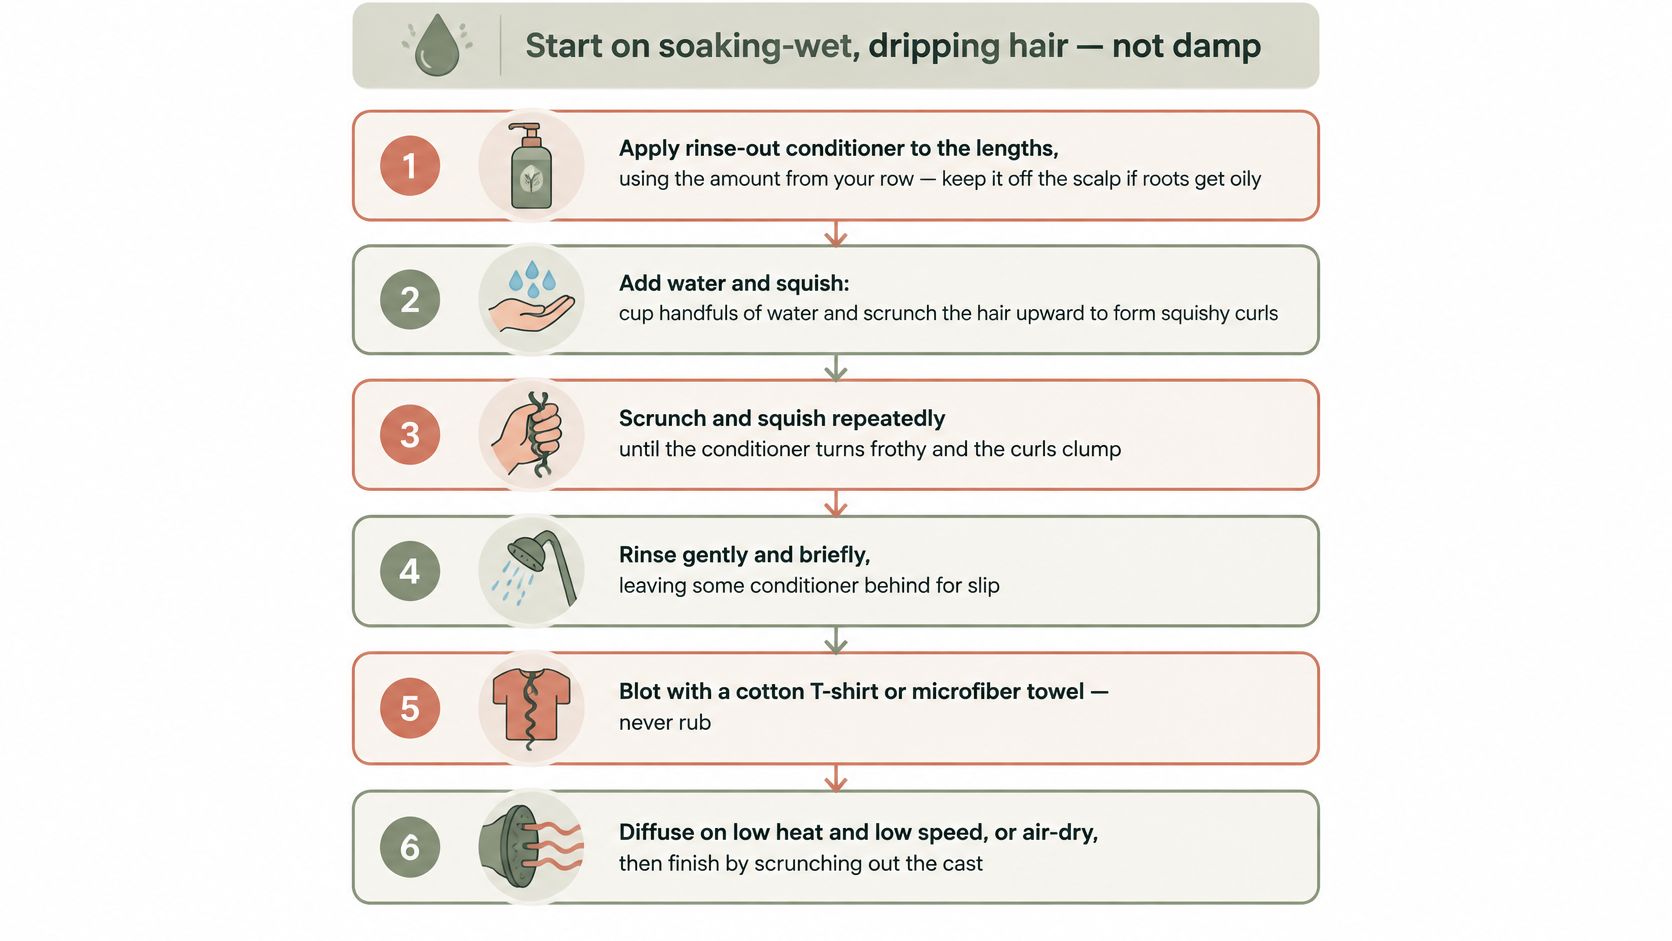
Use this visual as a movement guide, with one adjustment: your conditioner's directions and your hair's tolerance determine the rinse, not a requirement to leave residue behind.
Work through the wet stage
Cleanse and leave the lengths dripping. Rinse shampoo from the scalp and let water run through the interior of your hair. Don't wring the lengths out before conditioning. Starting merely damp makes it harder to spread the mixture without using more product.
Apply conditioner where you planned to use it. Smooth it over the mid-lengths and ends, then distribute it gently through the section. If the roots get oily, avoid dragging conditioner back onto the scalp while repositioning your hair.
Detangle while saturated. Use fingers or a wide-tooth comb, beginning at the ends and working upward as each area releases. Support the section above a snag rather than pulling against the root. Don't use repeated scrunching to work through knots.
Make sections you can reach through. Dense hair needs smaller working bundles, especially at the nape and crown. Fine waves may only need loosely separated areas rather than clips and elaborate sectioning. If the outside glides but the middle catches, your section is too large.
Cup water into a section and lift it upward. Let the ends rest in your palm, raise your hand toward the scalp, and gently close your fingers. Release without twisting or wringing. Add water when the mixture becomes pasty or stops spreading easily.
Repeat only while the section is improving. Watermans' curly-hair technique guide describes approximately three scrunches per section and a process that can take about 5–10 minutes, depending on length and thickness. Treat those as guideposts, not a quota you must complete after the hair has already grouped.
Rinse deliberately. Let water pass through the lengths without raking apart every clump. Remove rinse-out conditioner as directed, especially if your hair coats easily. If you need continuing conditioning afterward, a leave-in formulated for that purpose gives you more control than accidentally retaining a large amount of rinse-out product.
Stop handling when the section glides and holds together. Don't keep squeezing to chase a louder sound, froth, or a more dramatic curl. If the hair feels rough, first check saturation and trapped tangles rather than immediately adding another palmful of conditioner.
Stop rule: Stop adding conditioner when wet strands move past one another easily. Stop scrunching when further handling breaks apart the clump you just formed.
Conditioner has a practical role beyond making hair feel creamy. In independent textured-hair testing published through PubMed Central, rinse-off and leave-in conditioning treatments produced roughly a two-fold reduction in wet combing force in coily hair compared with a non-conditioning shampoo control; tested natural oils didn't improve wet combability, and some increased friction.
That finding supports using a conditioner for wet detangling. It doesn't establish a success rate for squish to condish itself, which remains a mechanical application technique rather than a clinically validated treatment.
Finish without undoing the clumps
Apply gel or cream while the lengths are still very wet. Smooth the styler over each clump with open hands, then use a gentle upward movement if needed to distribute it. Raking repeatedly at this stage can separate the groups you've just arranged.
For a demonstration of the hand movement, use the video below.
After applying styler, microplop by briefly lifting the wet ends in a cotton T-shirt or microfiber towel. Blot rather than twist, and stop before the fabric leaves the hair feeling dry or fuzzy.
Air-dry without repeatedly touching the lengths, or diffuse with low airflow and comfortable heat. If your gel forms a firm cast, wait until the hair is fully dry before gently softening it with your hands. Keep heavy butters and waxy finishing products out of the initial test if your hair already feels easily coated.
When Extra Conditioner Makes Hair Limp
The overload trap starts with a reasonable observation: your ends feel rough, so you add conditioner. But when the next wash looks flat, you may mistake poor definition for more dryness and add even more.
More slip isn't proof of more moisture. Dermatology guidance summarized by Health's explanation of conditioner use distinguishes conditioner's friction-reducing benefits from its weight, notes that thicker hair generally tolerates more product, and emphasizes that rinse-out conditioner is formulated to be removed.
Dryness and residue can also coexist. You might have rough ends and greasy-looking roots because the same amount of product went everywhere, not because the whole head needs a richer formula.
Read the finished hair before changing the bottle
Judge the result after drying, not only while your hands are covered in conditioner. Look for a combination of clues: lost lift, an unusual coated sensation, clumps that collapse into narrow strings, or drying that takes noticeably longer than your normal routine.
The table offers possible causes, not diagnoses. Pick the change that best matches what happened rather than applying every correction at once.
Squish to condish results and the next change
| What you see | Likely cause | Change next wash |
|---|---|---|
| Limp, greasy roots | Too much conditioner retained, or product on the scalp | Rinse fully; if placement was the problem, keep conditioner on lengths |
| Clumps fall apart | Hard squeezing, or hair dried before styler application | Use softer upward pressure, or apply styler before the lengths lose water |
| No squish, rough feel | Hair isn't wet enough, or a section remains tangled | Cup in water before adding more conditioner |
| Very slow drying | Heavy product or too much retained water | Try a fuller rinse; assess light microplopping separately |
| Frizz by afternoon | Uneven wetting, insufficient hold, or handling during drying | Apply the same styler evenly on very wet hair and leave it alone |
| Stringy or coated | Accumulated conditioner or styling residue | Cleanse buildup appropriately, then test a lighter conditioning finish |
Silicones aren't automatically a problem, and a coated feel doesn't identify a particular ingredient by itself. Waxes, oils, conditioner residue, and an unsuitable cleansing routine can all complicate the picture. Use a clarifying shampoo when buildup is plausible, rather than treating clarification as a compulsory part of every wash.
Protect volume without neglecting the ends
For hair that loses shape easily, the simplest correction is often a more complete rinse, not an entirely new product collection. Our fine curly hair routine offers a useful way to think about keeping conditioning concentrated where it's needed without smothering root volume.
A short tapered cut makes uneven product placement particularly obvious. Conditioner left on closely cropped sides can create a slick finish, while longer ends on top may still need detangling support. Apply by length and condition rather than spreading an identical layer everywhere.
Useful distinction: Hair that feels rough needs investigation. Hair that feels coated needs less residue, not another layer added on top.
If rinsing leaves the ends difficult to manage, work a small amount of conditioner back through those ends, detangle, and rinse appropriately. Don't take that localized problem as permission to coat the scalp again.
Persistent scalp itching, redness, or discomfort isn't a sign to keep adjusting scrunching pressure. Stop experimenting with retained product and seek appropriate medical advice if symptoms persist.
Set Your Next Wash and Track It
Choose either conditioner amount or rinse level as your next adjustment. Changing both may improve the result, but you won't know which change helped, and you won't have a reliable setting to repeat.
Keep the cleanser, styler, and drying approach as consistent as practical. If you switch from air-drying to diffusing, add a new gel, and reduce conditioner together, the finished result won't isolate what the squish to condish method contributed.
Record the result you actually want
Your record doesn't need to be technical. Write down the profile you chose, where conditioner went, whether you rinsed thoroughly, and whether you altered your section size.
Then check the finished hair and revisit it the following morning. Use the same descriptions each time so an enthusiastic shower impression doesn't replace what happened after drying.
- Clump definition: Did the groups stay recognizable, or split into thin pieces?
- Frizz: Was the surface reasonably settled for your preference, or did loose strands appear while drying?
- Moisture feel: Did the lengths feel flexible and comfortable, rough, or unusually slick?
- Heaviness: Did your roots retain lift, and could you move the hair without a coated sensation?
Use plain labels such as poor, acceptable, and good if a rating scale feels like unnecessary work. A short note you'll complete is more useful than a detailed template you abandon.
Photos can help if you keep the angle, lighting, and hair position similar. Don't compare freshly diffused curls photographed from above with slept-on hair photographed under harsh bathroom lighting and treat the difference as a conditioner verdict.
Repeat before you revise
A promising wash is a starting point, not a permanent answer. Give the same setup repeated use before deciding it works, unless it causes discomfort or an obviously unsuitable result.
For flat roots with comfortable ends, test a fuller rinse while keeping product amount steady. For manageable roots but rough ends, hold the rinse steady and adjust conditioner placement toward the ends. Those are distinct experiments, and keeping them separate makes the outcome easier to interpret.
If you need a format that suits your habits, compare the options in our guide to hair journaling apps for tracking curl definition and hair health. A phone note or paper notebook works too; the important part is connecting the setting you used with the result you got.
At Coil, our daily check-in lets you record what you did, rate how your curls feel, and optionally add a selfie. That provides a place to keep the comparison without relying on memory.
Keep a setting because your dry hair behaves better, not because the wet stage looks more impressive.
Once you find a comfortable balance, stop editing everything. Keep the successful approach long enough to recognize its normal result, then make targeted adjustments when your length, chemical history, products, or scalp needs change.
The next wash doesn't need more effort. It needs a clear choice, controlled handling, and a result you can describe.
Coil builds personalized routines around curl type, porosity, density, and scalp, with photo timelines and curl-score trends to help you follow changes over time. Visit Coil to build your routine and keep track of which conditioning and rinse settings leave your curls defined without feeling heavy.