Fine Curly Hair Routine That Adds Volume in 2026
A fine curly hair routine that adds volume without weighing curls down, with product amounts, wash steps and fixes for flat or frizzy curls.

Your curls look promising while they're wet. By lunchtime, the roots have collapsed, the ends still look fuzzy, and adding more curl cream only makes everything feel softer and flatter. That combination doesn't automatically mean your hair needs more moisture. You may be conditioning the right hair in the wrong place.
A useful fine curly hair routine separates the needs of your scalp, roots, and ends. Keep the root area clean and lightly styled, give the lengths enough slip to prevent tangles, and put extra conditioning only where the hair feels rough.
Fine Curly Hair Routine at a Glance
A fine curly hair routine has five repeatable stages: cleanse, condition, detangle, style, and refresh. The important decision is not just how much product you use, but where you leave it, particularly around the roots and on the ends.
Fine hair describes the thickness of individual strands, not how much hair you have. You can have fine strands and a dense head of curls, so don't assume every fine-haired person needs the same tiny amount of conditioner.
A Practical Dermatology review describes curly fibers as having an elliptical or ribbon-like cross-section; their bends and uneven alignment can make healthy curls feel rougher and increase grooming forces. That's why removing conditioner altogether isn't a sensible volume strategy. You need lubrication, but you don't need an equally rich coating from scalp to tip.
Your wash-day starting point
Fine curly hair routine stages at a glance
| Stage | How often | Core rule | Watch for |
|---|---|---|---|
| Wash the scalp | When oil, residue, or scalp discomfort calls for cleansing | Shampoo primarily on the scalp, not piled-up lengths | Buildup between washes |
| Condition | Every wash | Start at mid-lengths and work toward the ends | Conditioner near roots reducing lift |
| Detangle | Every wash, while wet and conditioned | Wide-tooth comb, ends toward roots | Snapping when you pull through resistance |
| Style | Every wash | Light leave-in if needed, then gel spread with water | A heavy coating or persistent stiffness |
| Refresh | When curls need reshaping between washes | Re-wet before adding more product | Stacking styler on already-coated hair |
There isn't a universal wash schedule for fine curls. In a 2024 survey by The Benchmarking Company, 47% of U.S. female hair-care consumers said they washed their hair two to three times per week, according to Global Cosmetic Industry. That describes consumer habits, not a prescription for your scalp.
Placement check: Soft ends with flat, slick roots suggest misplaced weight. Rough, snagging ends with clean roots suggest the lengths need better conditioning.
If your roots stay light and your curls remain grouped between washes, resist adding another step. If the scalp area looks greasy while the ends look dry, treat those as separate problems rather than coating everything with a richer product.
How to Wash and Condition Fine Curls
Start by cleaning the scalp thoroughly, not by trying to make every strand squeaky. The American Academy of Dermatology's healthy-hair guidance recommends applying shampoo primarily to the scalp and using conditioner after washing, with gentle handling of wet hair.
For fine curls, the practical adaptation is to keep routine conditioning away from roots that flatten easily. Dry or damaged sections may need more coverage, but that doesn't mean your entire head needs a richer wash.
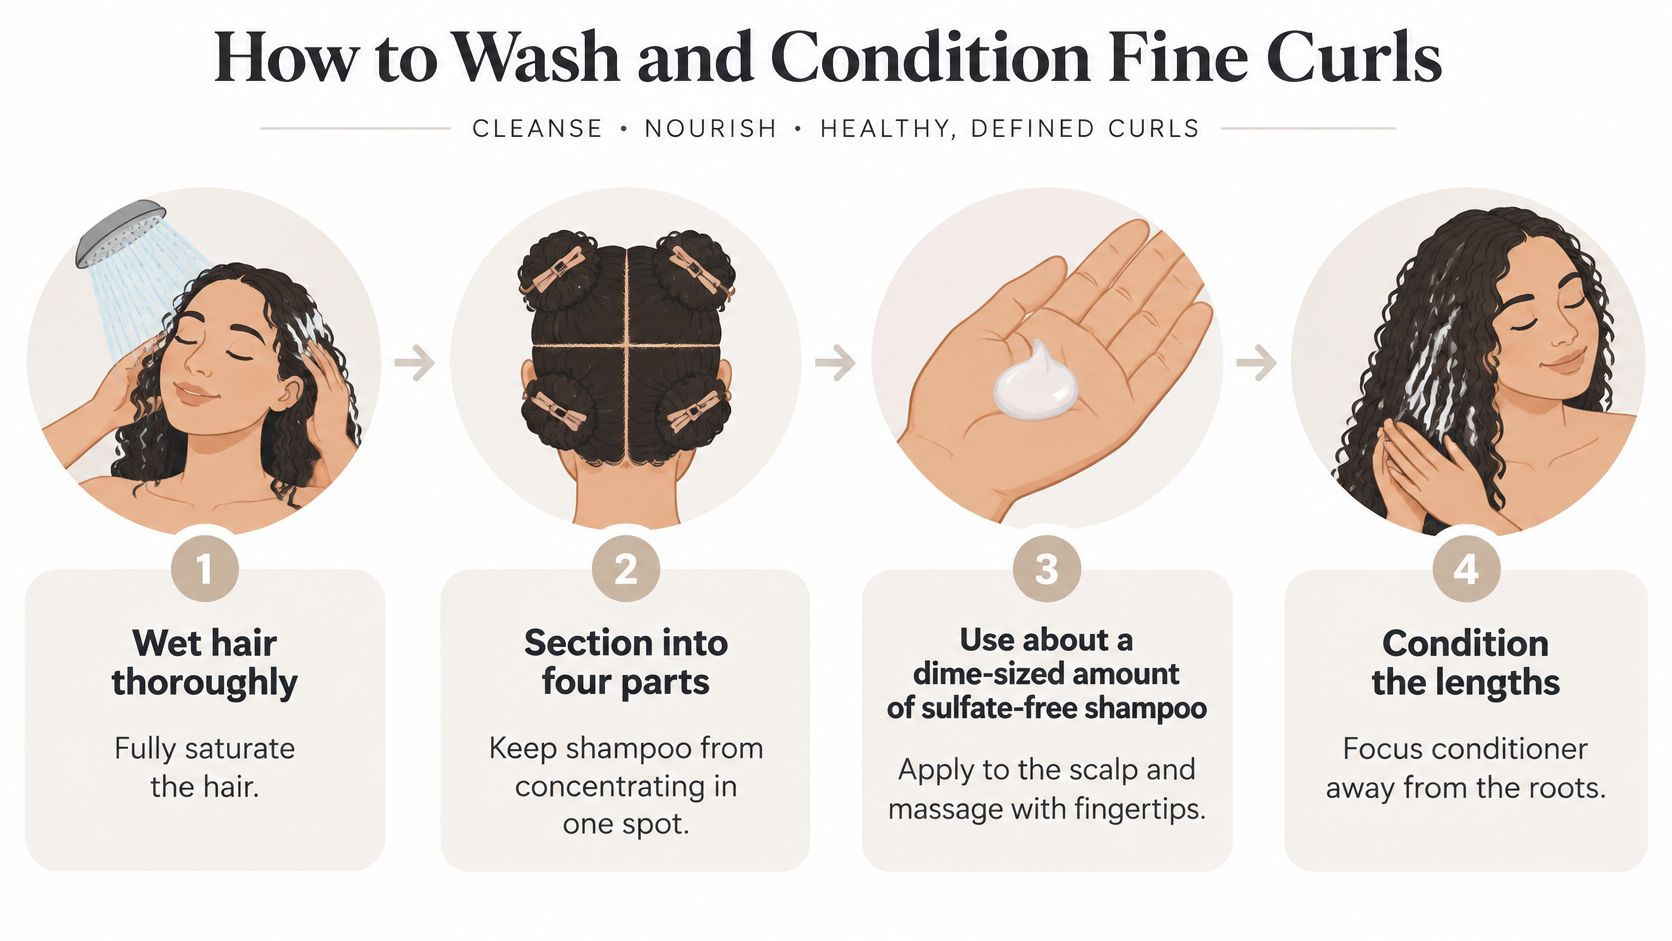
Use this shower sequence as a placement guide.
Clean the scalp without tangling the lengths
Saturate the hair before applying shampoo. Lift the roots so water reaches underneath, particularly around the nape and crown. Separate dense areas with your fingers rather than dragging shampoo across a dry outer layer.
Distribute cleanser across the scalp. For a practical starting example, spread a dime-sized amount between wet hands, then touch it onto separate scalp areas. Add water before adding more shampoo, and increase the amount only if you can't distribute it adequately.
Massage with fingertips, not nails. Work across the hairline, crown, sides, and nape. Don't twist the lengths into a bundle or scrub them against your scalp.
Rinse underneath as well as over the top. Lift sections and let water pass directly through the roots. If the lengths have obvious styling residue, gently work the flowing lather through them instead of rubbing.
A sulfate-free shampoo can be a starting option, but the label doesn't guarantee adequate cleansing or a lightweight finish. Judge the result: a comfortable scalp, no persistent coating, and lengths that don't feel stripped.
Don't automatically repeat the same shampoo application because the first pass produced little foam. Repeat only when the scalp still needs cleansing, not because you're chasing bubbles.
Put conditioner where it earns its place
Apply conditioner to the lengths first. For example, begin with a small dab for short hair or a walnut-sized portion for shoulder-length hair, spreading it between wet palms. These are trial amounts, not targets to force onto every head.
Check the ends before adding more. Smooth down each section and feel for areas that still catch. Add conditioner locally rather than bringing another handful toward the scalp.
Detangle before rinsing, then remove the excess. Follow the conditioner's directions for processing time. Rinse while separating sections until the hair feels flexible and manageable, rather than waxy or persistently coated.
Don't wring the hair like a washcloth. Support the lengths and squeeze gently so you don't create another knot immediately after removing one.
The finished wash should leave clean, light roots and soft, movable lengths. You don't need a slippery scalp to prove that you conditioned enough, and you shouldn't have to accept squeaky, snagging ends to get volume.
Detangling and Drying Without Losing Root Lift
Pulling harder isn't a detangling technique. High tension on wet, tangled hair can cause snapping, particularly when the lengths are already damaged, so treat resistance as a reason to pause.
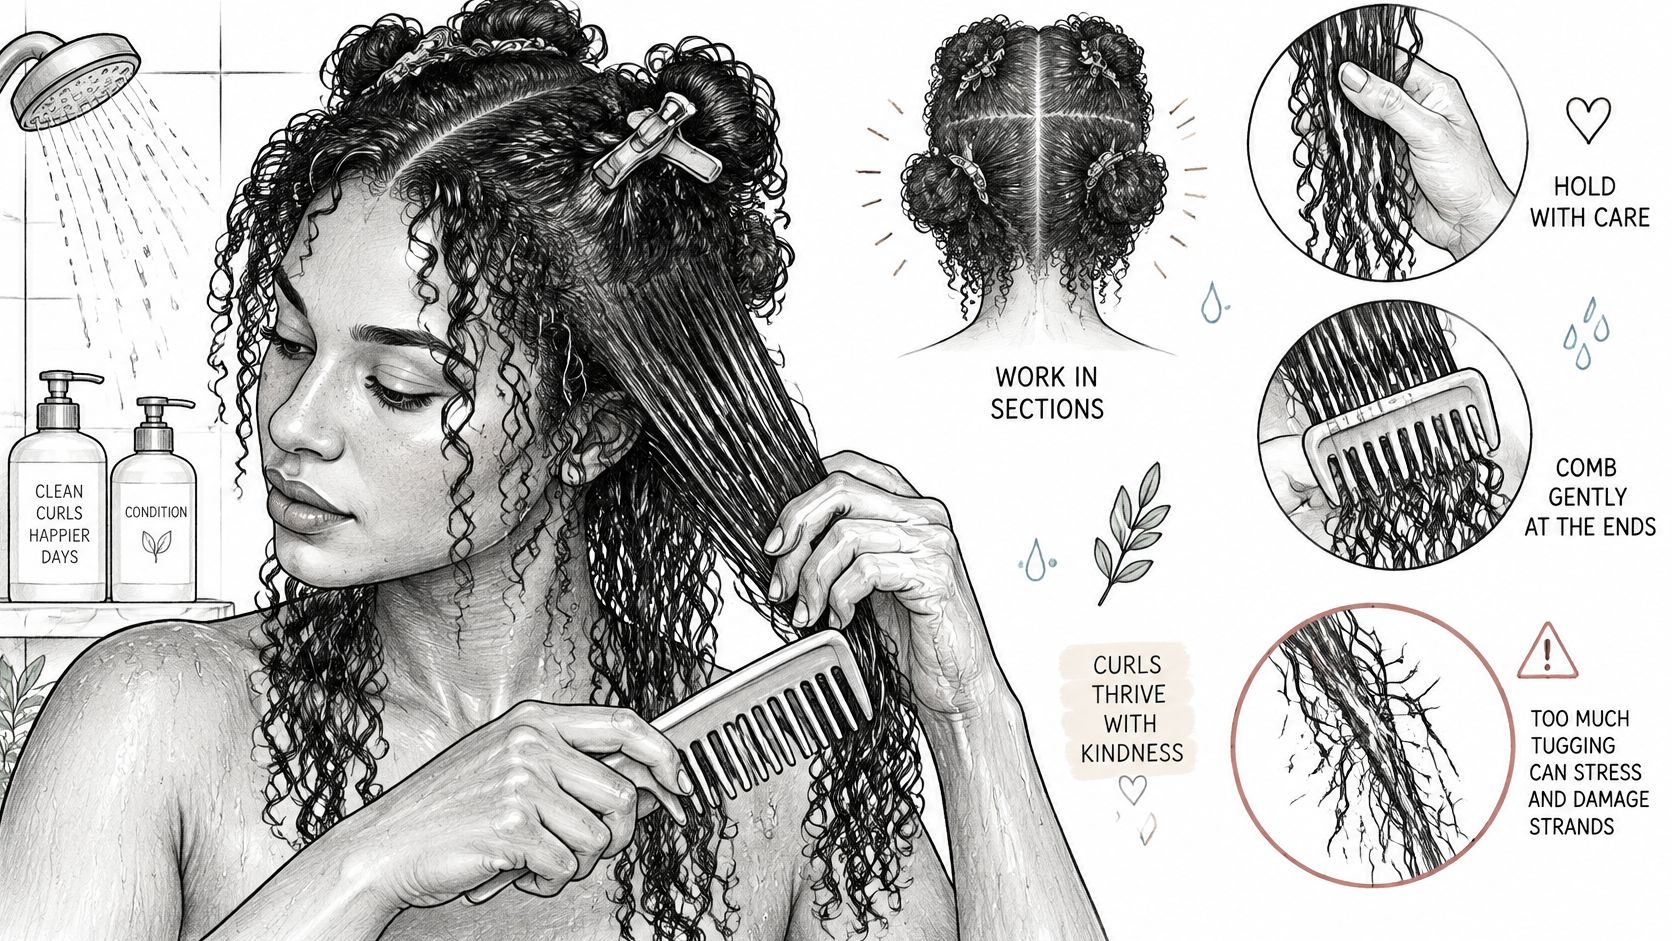
The sequence below keeps the work in manageable sections rather than transferring each tug through the whole head.
Remove tangles without pulling through them
Clip away hair you aren't working on. Make sections small enough that you can reach the underneath layers. Large sections hide knots and encourage repeated combing over the same outer hairs.
Use your fingers first. Start at the tips, separate crossed strands, and gradually move upward. If a knot tightens, add water and redistribute the conditioner rather than pulling it tighter.
Finish with a wide-tooth comb. Hold the section above the tangle and comb the ends before moving closer to the scalp. That supporting hand helps keep the pull away from the roots.
Rinse and squeeze gently. Use a smooth cotton T-shirt or microfibre towel to blot excess water. Don't rub the surface or twist the ends tightly.
Let curl groups settle. Apply your styler, encourage the shape briefly, then stop handling the hair repeatedly as it dries.
Conditioner has a real mechanical job here. In adapted textured-hair testing published in the International Journal of Cosmetic Science, conditioning treatments reduced combing force by greater than two-fold compared with a non-conditioning shampoo control; the tested natural oils didn't improve wet combability, and some increased friction.
That doesn't make every oil unsuitable. It means oil shouldn't replace the conditioning step that lets your comb travel through wet hair.
Dry for separation at the scalp
Air-drying is reasonable if your roots don't stay plastered against your head. Otherwise, use a diffuser with gentle airflow and low heat, changing your head position carefully rather than repeatedly tossing wet curls around.
For positioning and handling, follow this guide to diffusing curly hair. Avoid pressing the diffuser hard against the scalp or using your fingers to rake through partly dried clumps.
Watch the handling technique before trying to speed up drying.
After each wash, note short snapped pieces in the comb, how much resistance you encountered, and whether the roots stayed separated once dry. Don't treat every shed hair as breakage, and don't use a comb count alone to judge hair loss.
Styling Products That Hold Without Weight
Choose styling products by the film they leave and the result you need, not the curl promise on the packaging. A lightweight gel can offer useful hold, while a creamy product marketed for curls may give fine hair more softness than it needs.
Weight categories are starting guides, not fixed ingredient rules. A spray can still leave residue, and a concentrated gel can work well when distributed through very wet hair. Placement and formulation matter together.
Compare the job before choosing the product
Styling product types for fine curls
| Product type | Weight | Best for fine curls | Amount per section |
|---|---|---|---|
| Lightweight leave-in conditioner | Light | Slip and softness on rough lengths | A thin smear on wet palms |
| Water-based mousse | Light | Lift and light hold | A small puff, spread evenly |
| Gel emulsified with water | Light to medium | Defined clumps and controlled hold | A small dab spread between wet palms |
| Custom curl cream | Medium | Softening dry ends | A trace on the ends only |
| Shea or butter styler | Heavy | Rich conditioning where genuinely needed | Minimal residue on dry ends, not a default step |
| Oil, such as argan or jojoba | Light to heavy | Finishing flyaways at the ends | A trace transferred from fingertips |
| Pomade or wax | Heavy | Targeted finishing, with a volume trade-off | Keep out of the everyday root routine |
For a hypothetical starting application, try a pea-sized portion of leave-in on a wet section, then assess whether it spreads without leaving a creamy film. The useful amount changes with section size, hair density, and product concentration.
Don't use that same portion automatically on every section. A short, sparse area near the temples doesn't need the amount you might use through a dense back section.
More softness isn't always progress. If the hair already feels smooth and flexible, the missing styling function may be hold.
Layer less, and refresh selectively
I'd start with a light leave-in only where necessary and a gel for hold. Apply the conditioning layer first, keep it off the scalp, and skip cream-and-gel combinations while establishing your baseline.
Cream and gel aren't incompatible. They make troubleshooting harder when you don't yet know which layer is flattening the hair. This comparison of curl cream and gel helps separate softening from hold.
For a refresh, work locally rather than repeating the full wash-day application:
- Dampen the lengths: Mist until the affected hair is pliable, not drenched.
- Address roughness: Smooth a trace of leave-in over a dry-feeling patch, skipping the scalp.
- Repair a separated clump: Spread a little gel with water between your fingers and apply only there.
- Let it set: Air-dry or diffuse gently without repeated scrunching.
Keep butter away from roots you want lifted, and don't rake fresh gel through dry, coated hair. If a refresh requires more and more product to look acceptable, the better decision may be washing, not adding another layer.
Fixing Flat, Frizzy or Greasy Fine Curls
When roots collapse by midday, check for conditioner or cream near the scalp before buying a stronger volumizer. That's a useful first suspect, not a diagnosis: scalp oil, incomplete rinsing, drying position, and your natural hair distribution can also affect lift.
Frizz alone doesn't prove dryness. Feel the hair as well as looking at it. Rough, snagging ends call for a different change from soft, coated lengths that won't hold a curl.
Match the symptom to a testable cause
Fine curl symptoms, causes and fixes
| Symptom | Likely cause | Fix |
|---|---|---|
| Flat roots by midday | Conditioner or cream near the scalp | Keep conditioner below the root area and rinse thoroughly |
| Frizz between washes | Insufficient conditioning or repeated handling during drying | Test leave-in on rough areas, or stop touching during drying |
| Limp curls without clumps | Heavy cream, butter, or excessive conditioning | Remove the rich styler before changing the conditioner |
| Crunchy, cast-like curls | A normal gel cast, or more gel than you need | Let hair dry fully, soften the cast gently, then assess |
| Scalp becoming greasy soon after washing | Root-level residue or inadequate cleansing | Cleanse the scalp carefully and keep stylers on the lengths |
| Breakage while detangling | Dry detangling or excessive pulling | Detangle wet with conditioner, fingers first, then a wide-tooth comb |
Choose a single change from the relevant row. For frizz, that means choosing between adding localized conditioning and reducing handling, not changing both at once.
A dry gel cast also needs a fair test. A cast that softens into springy curls isn't a failure or proof that you used too much product. If the hair stays tacky, stringy, or stiff after it's fully dry and gently softened, reduce the gel at the next wash.
Separate residue from dryness
Say your crown feels slick but the lower lengths catch against your fingers. Adding a mask everywhere may improve the ends while making the crown flatter. Keep cleansing focused on the scalp and direct the extra conditioning to the rough area.
For a scalp that feels oily despite light styling, review your cleansing technique and this guide to shampoo and oil control. Don't assume stronger shampoo is the answer if you've been missing the nape or failing to rinse underneath.
Change the location before changing the bottle. A useful conditioner can still give a poor result when you leave it where you need lift.
You may notice a placement improvement at the next wash, while a new washing pattern needs repeated observations before you judge it. Cosmetic adjustments won't resolve every scalp problem.
Hair advice on this site is general information, not medical advice. Persistent itching, flaking, scalp discomfort, or hair-loss concerns should be checked by a dermatologist rather than managed through endless product substitutions.
Track Four Wash Days Before Changing Products
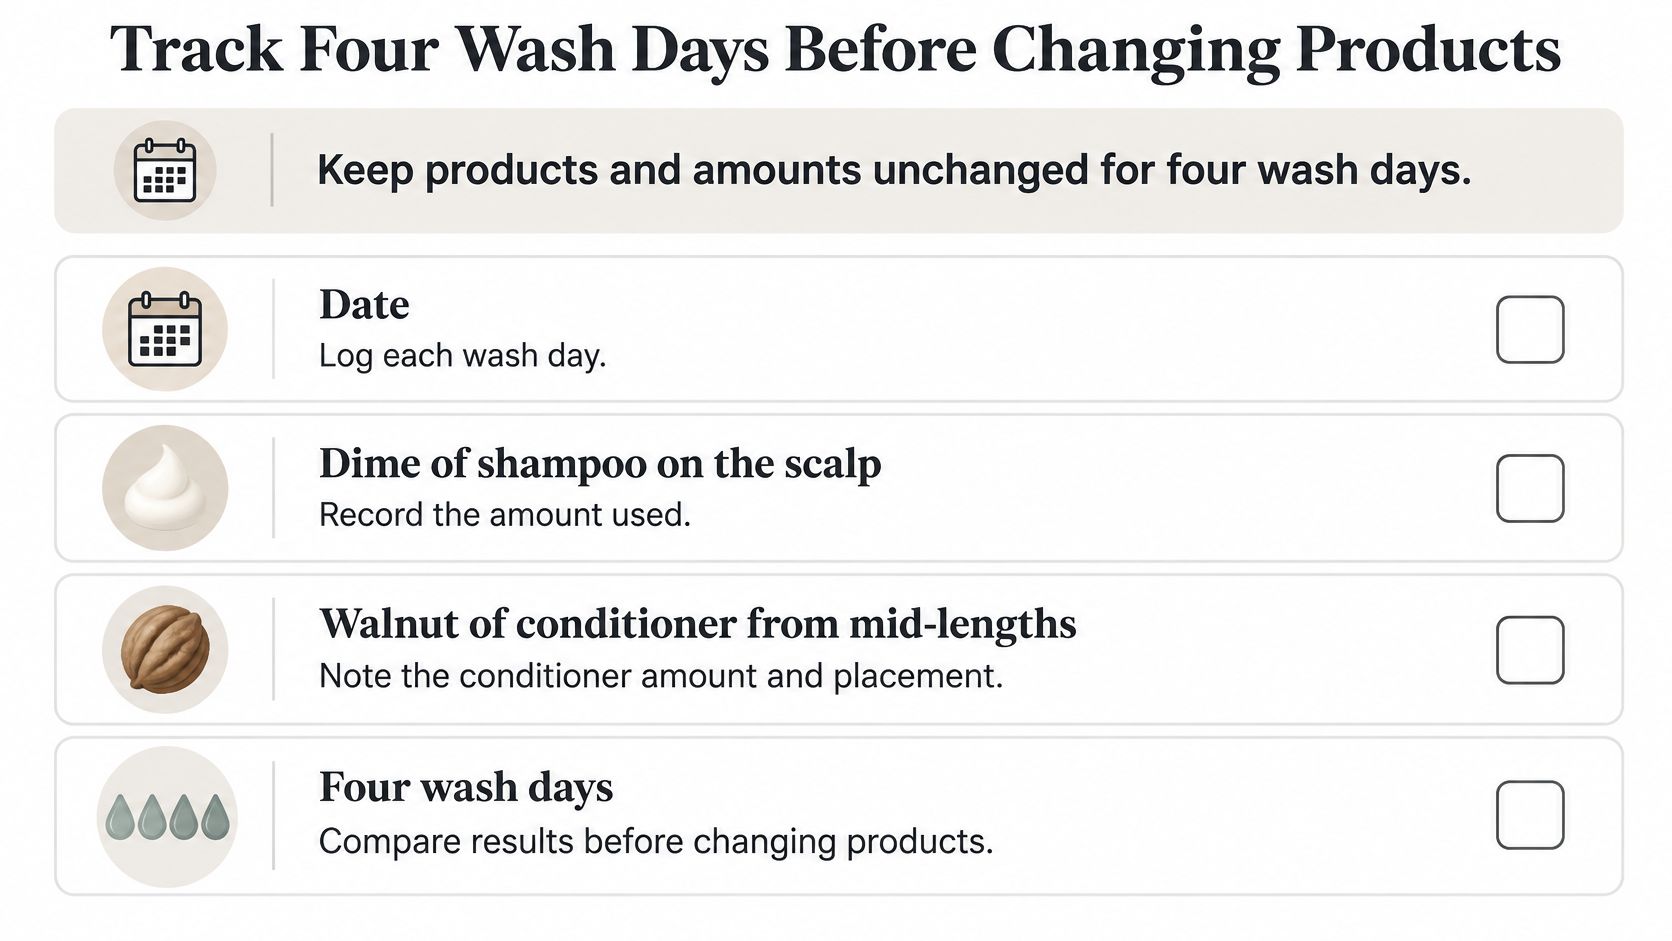
Keep products and amounts unchanged for a short, repeatable baseline before replacing anything. I recommend a four-wash-day trial as a practical comparison exercise, not a clinical test or a promise that every hair problem resolves on that schedule.
If you already know a step causes discomfort, don't repeat it for the sake of completing a log. Correct that problem first, then keep the revised routine stable.
Use this checklist to record what you did.
Record placement alongside amounts
Your wash log doesn't need elaborate ratings. It needs enough detail to distinguish a product problem from a technique change.
- Wash details: Record the date, cleanser, amount, and whether the scalp felt clean after rinsing.
- Conditioner placement: Note where you began applying it, which ends needed extra, and whether any reached the roots.
- Styling application: Record the products, approximate portions, hair wetness, and whether you styled in sections.
- Drying method: Note air-drying or diffusing and any handling while the curls were setting.
- Next-morning result: Describe root lift, curl grouping, frizz, and scalp feel separately.
For example, a log might say that you used a dime-sized shampoo portion, a walnut-sized conditioner portion below the ears, and pea-sized styling portions on wet sections. Those details describe an example routine, not quantities every reader should copy.
Photograph the same side of your hair in similar light and from the same distance. Keep the camera angle consistent so a tilted head or brighter window doesn't make the comparison misleading.
Make the next change specific
At the end of the trial, choose the clearest pattern. Flat roots with comfortable lengths suggest a placement or residue adjustment; clean roots with rough ends suggest targeted conditioning; soft curls that separate quickly suggest testing hold.
A paper note or phone note is enough. If you already keep your curl notes in Coil, store the entries there, but don't replace a useful baseline with another product quiz before you understand the pattern.
Keep refreshes simple during the comparison, and record any extra styler you add. Otherwise, you may blame wash-day gel for weight that came from repeated between-wash applications.
This week, choose the symptom that bothers you most and make a single correction. Keep the remaining steps stable through your next four wash days, then decide from the results whether you need a different product or better placement.
Coil builds a routine around your curl type, porosity, density, and scalp, then lines your curl score up against your products and habits to help sharpen the routine. Visit Coil if you want a structured way to track whether changes in conditioning, styling, and drying are helping your fine curls.