How to Diffuse Curly Hair Without Frizz or Heat Damage
Learn how to diffuse curly hair with the right heat, airflow and distance for your curl type, plus a step-by-step routine.
You've washed your hair, your curls look defined while they're wet, and now you're holding a dryer wondering how to get them dry without turning them into a frizzy cloud. The diffuser helps spread airflow, but it doesn't make heat harmless or technique unnecessary.
A reliable routine is about controlling airflow and distance before increasing heat, keeping curl clumps undisturbed, and stopping when your roots are cool and dry and there's no dampness inside. Those checks are more useful than following a fixed drying time.
Diffuser Settings and Distance by Curl Type
| Hair type or condition | Heat | Airflow | Distance | Stop when |
|---|---|---|---|---|
| Wavy 2A–2C | Low to medium | Low | About 15 cm, keep moving | Roots are cool and dry, with no damp interior |
| Curly 3A–3C | Low | Low | About 15 cm, bowl never still | Clumps are dry through, then finish with cool air |
| Coily 4A–4C | Low | Low to moderate | About 15 cm, roots first | Scalp feels comfortable and roots are dry |
| Fine or chemically treated | Lowest | Low | 15 cm or more, in shorter sessions | Hair is dry to the touch; stop before it feels brittle |
| Dense hair that dries slowly | Low | Moderate, raise airflow rather than heat | About 15 cm, in smaller sections | The interior feels dry when squeezed |
Treat the table as a starting point. Density, length, porosity and how much water is still in your hair will shift these settings, so the numbers need checking against what you feel. The stop point stays the same across every row: cool, dry roots and no damp interior beat any timer.
Adjust airflow before heat
When drying drags on, the first move is more airflow, not more temperature. Faster moving air carries moisture away sooner, so the hair surface gets dry without sitting in hotter air. If the stream starts pushing curls out of their clumps, pull the dryer farther back or drop the speed a notch.
Keep the bowl moving between sections. Don't park it against your scalp or leave it hovering in one spot for a long stretch. For dense hair, divide the hair into smaller sections so air can reach the inside rather than drying only the outer layer.
Distance matters because heat at the hair surface climbs sharply the closer the nozzle gets. Starting at about 15 cm and keeping the dryer in motion gives you a buffer: if you need more drying power, you still have room to edge closer briefly on a stubborn, dense section rather than living at close range the whole session.
Practical rule: If drying is slow, try smaller sections and a modest airflow increase before reaching for more heat.
A setting that works on one wash day may need retuning the next, since the hair's starting wetness and product load change how quickly it dries. If you're building a routine around your hair rather than following a one-size-fits-all template, this guide to creating a 2B hair routine walks through the other habits that shape the result.
How to Diffuse Curly Hair Step by Step
This seven-step routine takes you from wet, product-coated curls to a finished style without repeatedly disturbing the pattern. A diffuser technique described in the Journal-Advocate's guide to using a hair diffuser pairs hover diffusing with pixie diffusing, which lets you start gently and then work curl sections more directly once the outer layer has begun to set.
Apply product to soaking-wet hair. Work your styler through sections from the roots down so it's distributed across the curls while they're still grouped together. Applying product after the hair has partly dried can leave it patchy and make clumps harder to preserve.
Press out excess water. Use a microfiber towel or cotton T-shirt, cupping each section and squeezing gently rather than rubbing. Friction and shaking can separate wet clumps, one of the main routes to frizz.
Hover above the curls. Hold the bowl just above the curl surface and use low to moderate airflow with low to medium heat. This helps set the product film without pressing the bowl into your hair or forcing curls apart.
Switch to pixie diffusing when a cast forms. Place one curl section in the bowl, lift it toward your scalp and hold it still for roughly 20–30 seconds before moving on. If you rush through the hold or keep shifting the section, the curls get more disturbance without a clear drying benefit.
Start at the roots and rotate through small zones. Roots tend to retain moisture longest, so give them attention while moving around the scalp rather than repeatedly returning to the same clump. That rotation helps you avoid overdrying one patch while leaving another wet.
Raise airflow before temperature if you need more speed. Keep the heat setting steady and increase airflow only if it doesn't disrupt the curl shape. Turning up the heat by default can create localized overheating as the hair dries.
Finish with cool air and wait to scrunch. Once your hair is nearly dry, use cool air, then scrunch only when it's fully dry. Scrunching damp curls can break up the shape you've just set; if you use gel, the cast can feel firm at first and soften with a careful scrunch when dry.
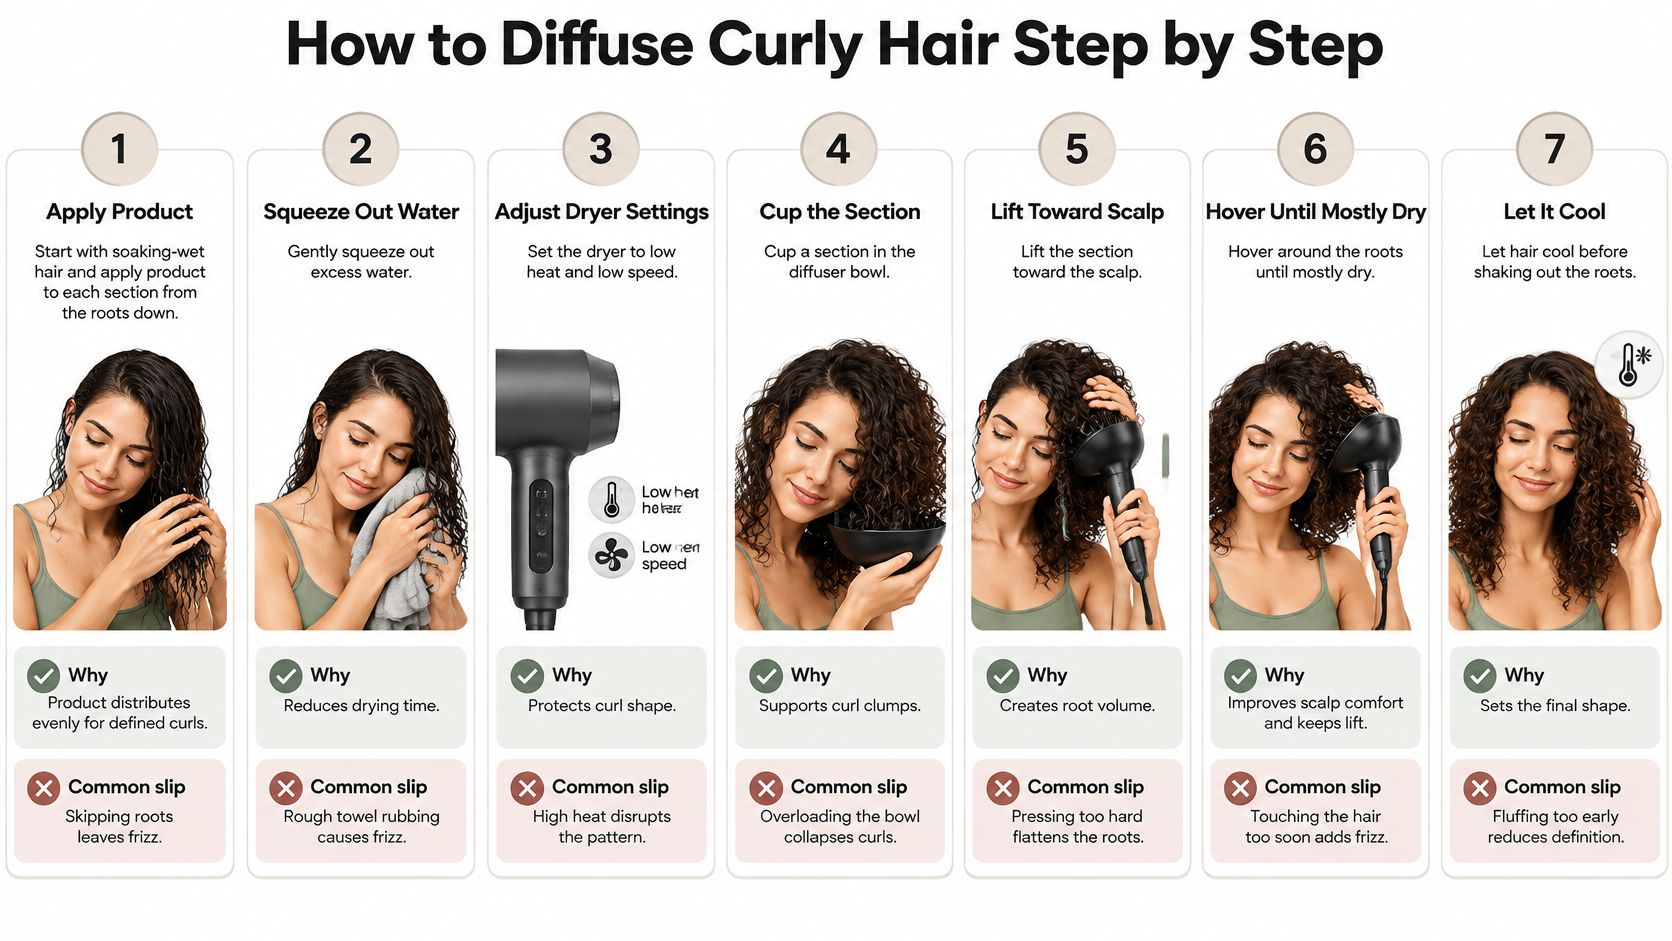
Keep your hands out of the curls while they're setting. Don't brush, shake or repeatedly separate damp clumps to check whether they're dry. If you're deciding between a curl cream and a gel for hold, compare curl cream and gel before changing your drying technique.
Diffusing Roots for Short, Dense and Coily Hair
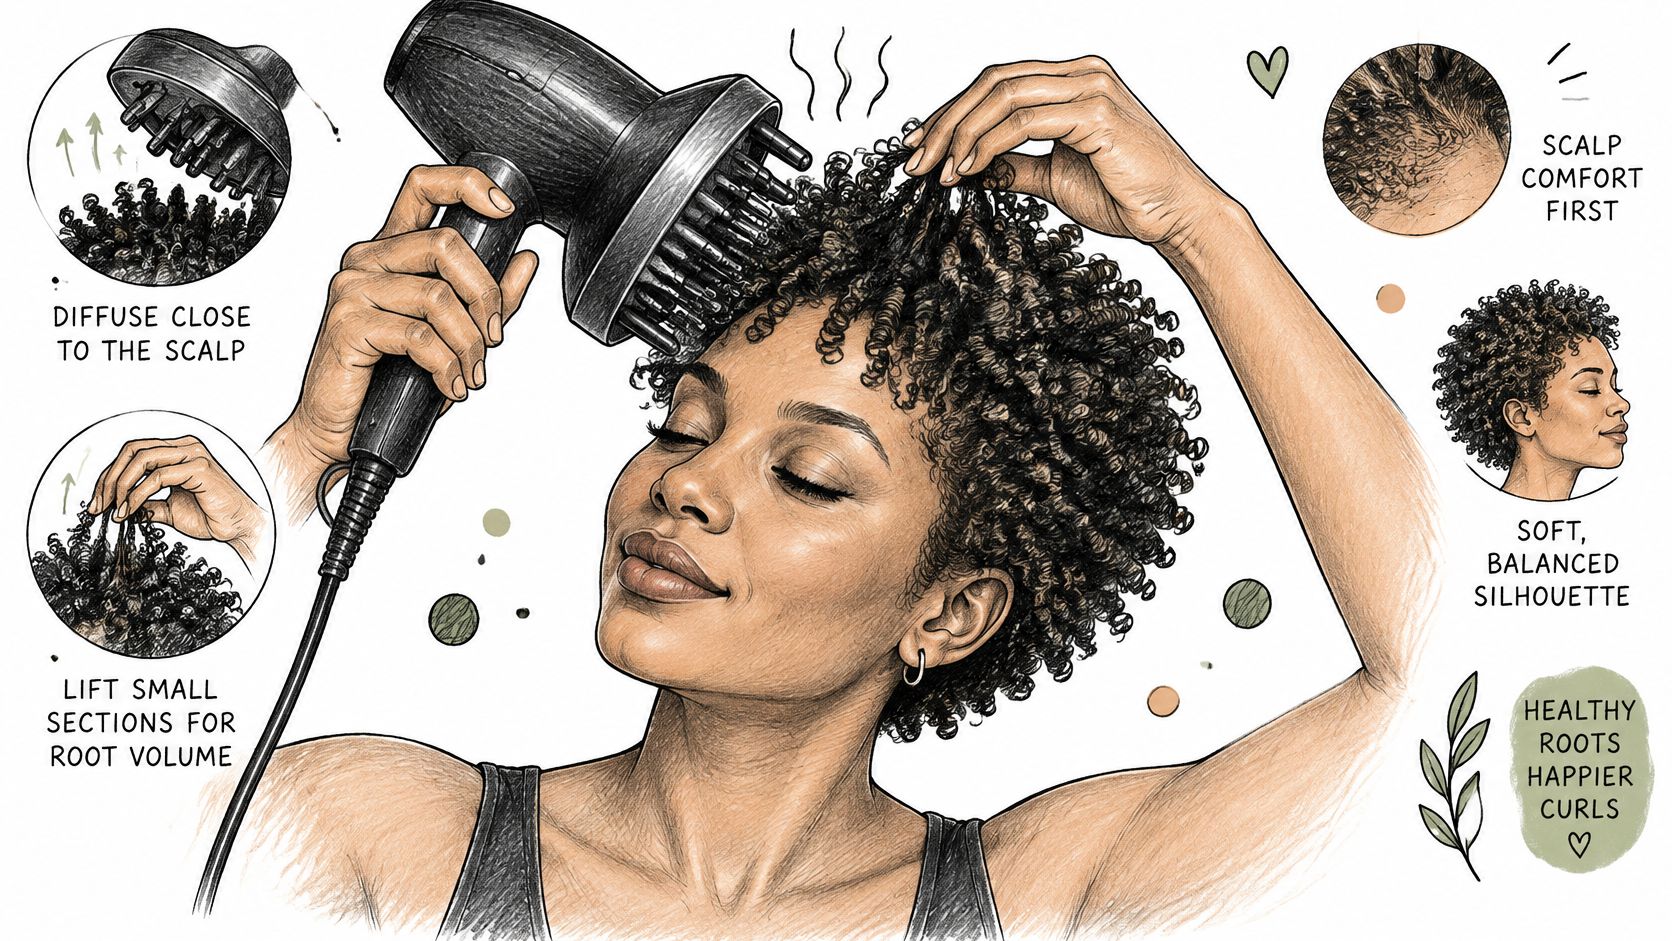
For short, dense or coily hair, the challenge is often the roots and inner layers, not the visible surface. Lift sections toward the scalp for volume, but hover the diffuser rather than pressing it firmly against your head. Use low heat and low airflow, and move through the roots so the scalp stays comfortable. Excessive airflow can disturb curl formation and contribute to frizz, as described in Prose's guidance on using a diffuser.
Dense or coily hair
Start with the roots and divide dense hair into smaller sections. A surface that feels dry can hide dampness inside, so squeeze a section near the scalp and through the interior before deciding it's finished. If the section is still damp, keep working through the hair in small zones rather than extending exposure on the outer layer.
Short curls and fades
Short hair sits close to the scalp, so use a lighter hand and less product than you might use on longer hair. Work around the head in small areas, lifting the roots without pressing the bowl hard against the skin. For fades or short curls, check that your scalp doesn't feel hot or tender before continuing.
Grow-outs and mixed lengths
When you're growing out a cut, the new growth and older ends may need different handling. Start with the ends if they're dry or fragile, then work toward the roots; use a lighter touch on the ends and keep them from being held in the airflow for too long. For short, dense hair where the roots stay wet longest, go root-first instead.
See the video below for a visual reference on diffuser placement and sectioning.
Before changing heat, consider density, length and scalp sensitivity. Smaller sections help with density; changing the order of drying helps with length; and a cooler setting or more distance may be the better adjustment if your scalp feels uncomfortable. Check the inside of a section by squeezing it, even when the outside feels dry.
Fixing Frizz, Stiffness and Heat Damage
Don't assume that air-drying is always safer or that low heat alone solves every problem. Drying method, distance, temperature and duration work together, so the right choice depends on your hair's condition and how long it takes to dry. A summary of the Annals of Dermatology experiment reports that natural drying caused internal cell-membrane-complex damage in the study, while a moving dryer held about 15 cm away caused less overall damage than prolonged natural drying (the heat-versus-air-drying findings summarized by Kurli). That doesn't prove diffusing is the right choice for everyone; it does mean “never diffuse” isn't a universal rule.
If your hair is damaged, color-treated, dense or low-porosity, consider letting it air-dry partway, then diffusing briefly with a comfortable heat setting. Stop before you're tempted to keep applying heat just to make every strand feel completely dry. Finish with cool air and check the roots and interior before putting the dryer away.
| Symptom | Likely cause | Fix |
|---|---|---|
| Frizz that appears after drying | Wet curls were touched or shaken, or airflow was too high | Stop touching clumps, lower airflow and scrunch only when fully dry |
| Flat roots | The diffuser was pressed against the scalp or sections weren't lifted | Lift toward the scalp, hover and keep the bowl moving |
| Stiff, crunchy curls | Too much product or hair was dried too aggressively | Use less product, add moisture and finish with cool air |
| Brittle or straw-like ends | Heat was held too close or for too long | Increase distance, lower heat and air-dry partway before diffusing |
| Scalp tenderness or itch | Heat stayed on one area | Keep the dryer moving, use cool air and get medical advice if it persists |
Tell a cast from damage
Temporary stiffness usually comes from a product cast or from hair that hasn't finished drying. Once it's fully dry, a gentle scrunch can soften the cast without undoing the curl shape. If your hair still feels rough or brittle after the cast is gone, don't respond by scrunching harder or adding more product.
Brittleness that persists across wash days calls for less heat exposure and a closer look at your distance and drying habits. Change the drying routine before overhauling every product at once. For more on how to troubleshoot frizz without guessing at the cause, see this guide to why curly hair gets frizzy.
If scalp soreness, itching or hair loss persists, consult a dermatologist rather than trying to solve it by adjusting dryer settings alone. Hair-care advice can't diagnose a scalp condition.
Choose Your Settings and Track the First Week
Pick one starting row from the settings table and use it consistently for a week. Write down your distance, heat, airflow, product, and where you stopped drying; add one word each for definition, frizz and moisture. Check your curls when they're dry and again the next morning so you can distinguish the immediate finish from how the style settles.
A notebook or notes app is enough. Keep each entry short, and change one variable at a time: distance first, then airflow, then heat. If frizz shows up the next morning, for example, keep your temperature steady and check whether holding the bowl farther away while moving continuously improves the result. Don't change heat, product and technique together, or you won't know which adjustment helped.
Stop a change immediately if it causes scalp discomfort or brittle-feeling hair. Return to the previous setting and use the symptom table to choose a safer next step.
Coil builds routines around curl type, porosity, density and scalp, then lines the curl score up with your products and habits so the routine can get sharper. Its daily check-in lets you tick off what you did, rate how your curls feel and optionally add a selfie, giving you a simple way to track diffuser settings alongside your results.
Use the first week to find a diffuser routine that suits your curls, not just a setting that dries them quickly. Coil builds and adapts curly-hair routines around your hair and habits, so you can connect your drying choices with how your curls look and feel.